A research group in Britain has recorded data into a crystal of nanostructured glass. This future storage with practically unlimited lifetime and capacity exceeding Blu-Ray’s by 2,800 times might save civilization’s data for aliens if humankind is gone.

A group of scientists from University of Southampton has developed a ‘five-dimensional’ optical memory, having experimentally proven a possibility of recording data into nanostructured glass using a high speed (femtosecond) laser, which creates self-assembled nanostructures in fused quartz.
The creators of 5D memory has dubbed their invention ‘Superman memory crystal’, following the ‘memory crystals’ used in a number of movies featuring the superhero.
The method is called 5D because in addition to the three dimensional position of these nanostructures their refraction and polarization characteristics work as two additional parameters.
The newly-developed storage promises unprecedented data capacity of 360 Terabyte for a DVD-sized disc. The maximum capacity of a latest generation quad-layer Blu-Ray DVD is “only” 128 Gigabytes. The largest heat-assisted magnetic recording hard drive (HAMR), yet to be commercially produced, will have about 20 terabytes per disc.
Glass storage could preserve data for millions of years whereas a DVD guarantees only about seven years of faultless playback.
The nanostructured glass remains stable if exposed to temperatures up to 1,000°C.
“We are developing a very stable and safe form of portable memory using glass, which could be highly useful for organizations with big archives. At the moment companies have to back up their archives every five to ten years because hard-drive memory has a relatively short lifespan,” said the head of the project Jingyu Zhang, pointing out that museums and national archives with their huge numbers of documents are going to be the first to benefit.
A joint project of University of Southampton’s Optoelectronics Research Centre (ORC) and Eindhoven University of Technology has presented ‘5D Data Storage by Ultrafast Laser Nanostructuring in Glass’ report at the Conference on Lasers and Electro-Optics (CLEO’13) in San Jose, California.
The ORC’s physical optoelectronics group supervisor Prof. Peter G. Kazansky, follower of the Nobel Prize laureate for the invention of laser, Aleksandr Prokhorov, shared that “It is thrilling to think that we have created the first document which will likely survive the human race. This technology can secure the last evidence of civilization: all we’ve learnt will not be forgotten.”

These light impulses modify polarization and refraction of self-assembled dots as the light travels through the glass, somehow similar to the principle used in polarized sunglasses. Later the information encoded in dots’ 5D parameters can be read using an laser scanning device similar to the one used to read CD, DVD and Blu-ray discs and an optical microscope capable of untangling the polarized light reflected by the three-bit spots.
So far there is no talk about re-writing glass discs so they are going to be write-once-read-many (WORM).
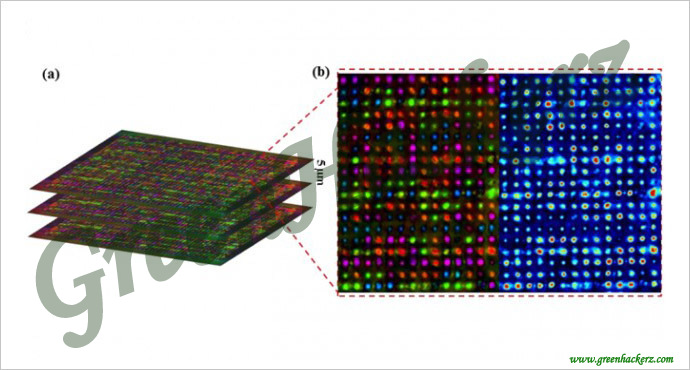
Unlike modern DVD and Blu-Ray disks which record data on up to four layers, the 5D data storage will have hundreds of layers (around 400 layers for standard 1.2 mm CD), but will be made of glass instead of plastic encasing metal spraying with data.
So far the developers reported of a successful recording and reading of a 300kb text file on three layers of glass, but this is regarded only as a technological demonstration of this ground-breaking new technology with a very bright future.

A group of scientists from University of Southampton has developed a ‘five-dimensional’ optical memory, having experimentally proven a possibility of recording data into nanostructured glass using a high speed (femtosecond) laser, which creates self-assembled nanostructures in fused quartz.
The creators of 5D memory has dubbed their invention ‘Superman memory crystal’, following the ‘memory crystals’ used in a number of movies featuring the superhero.
The method is called 5D because in addition to the three dimensional position of these nanostructures their refraction and polarization characteristics work as two additional parameters.
The newly-developed storage promises unprecedented data capacity of 360 Terabyte for a DVD-sized disc. The maximum capacity of a latest generation quad-layer Blu-Ray DVD is “only” 128 Gigabytes. The largest heat-assisted magnetic recording hard drive (HAMR), yet to be commercially produced, will have about 20 terabytes per disc.
Glass storage could preserve data for millions of years whereas a DVD guarantees only about seven years of faultless playback.
The nanostructured glass remains stable if exposed to temperatures up to 1,000°C.
“We are developing a very stable and safe form of portable memory using glass, which could be highly useful for organizations with big archives. At the moment companies have to back up their archives every five to ten years because hard-drive memory has a relatively short lifespan,” said the head of the project Jingyu Zhang, pointing out that museums and national archives with their huge numbers of documents are going to be the first to benefit.
A joint project of University of Southampton’s Optoelectronics Research Centre (ORC) and Eindhoven University of Technology has presented ‘5D Data Storage by Ultrafast Laser Nanostructuring in Glass’ report at the Conference on Lasers and Electro-Optics (CLEO’13) in San Jose, California.
The ORC’s physical optoelectronics group supervisor Prof. Peter G. Kazansky, follower of the Nobel Prize laureate for the invention of laser, Aleksandr Prokhorov, shared that “It is thrilling to think that we have created the first document which will likely survive the human race. This technology can secure the last evidence of civilization: all we’ve learnt will not be forgotten.”
Technology similar to polarized sunglasses
Technically speaking, the process appears as follows. A femtosecond laser that produces extremely short (280 femtoseconds – or 280 quadrillionths of a second) and intense pulses of light encrypts data file into layers of nanostructured dots inside a quartz glass. The layers are placed very close, with mere five micrometers (one millionth of a meter) between them.These light impulses modify polarization and refraction of self-assembled dots as the light travels through the glass, somehow similar to the principle used in polarized sunglasses. Later the information encoded in dots’ 5D parameters can be read using an laser scanning device similar to the one used to read CD, DVD and Blu-ray discs and an optical microscope capable of untangling the polarized light reflected by the three-bit spots.
So far there is no talk about re-writing glass discs so they are going to be write-once-read-many (WORM).
Unlike modern DVD and Blu-Ray disks which record data on up to four layers, the 5D data storage will have hundreds of layers (around 400 layers for standard 1.2 mm CD), but will be made of glass instead of plastic encasing metal spraying with data.
So far the developers reported of a successful recording and reading of a 300kb text file on three layers of glass, but this is regarded only as a technological demonstration of this ground-breaking new technology with a very bright future.
Source:http://rt.com/news/5d-nanostructured-glass-optical-memory-941


")